A hydraulic system is the powerhouse of many heavy-duty machines, from log splitters to tractors, relying on specialized hoses to transmit fluid under immense pressure. When one of these hoses fails, it can bring your work to a grinding halt, create hazardous leaks, and impact overall machine performance. While the idea of tackling a hydraulic hose replacement at home might seem daunting, it is a manageable task for the mechanically inclined, provided you adhere to strict safety protocols and follow a clear, step-by-step process. This comprehensive guide will walk you through everything you need to know to safely and effectively replace a broken hydraulic hose, restoring your equipment to optimal working condition.
Understanding Your Hydraulic System and Hoses
Before you dive into a replacement, it’s beneficial to understand what hydraulic hoses are and why they fail. These robust hoses are engineered to withstand thousands of pounds per square inch of pressure, acting as the arteries of your hydraulic system, channeling fluid to power cylinders, motors, and other components. Their ability to flex and absorb vibration makes them indispensable in dynamic environments.
What is a Hydraulic Hose and How Does It Work?
|
Our Picks for the Best Log Splitter in 2026
As an Amazon Associate I earn from qualifying purchases.
|
||
| Num | Product | Action |
|---|---|---|
| 1 | Firewood Kindling Splitter for Wood, Heavy Duty Cast Iron Wood Splitters for Firewood with No Axe, Manual Log Splitter for Kindling Wedge Point with Safety Cover |

|
| 2 | Kindling Cracker King XL Firewood Kindling Splitter – Extra-Large Cast Iron Wood Splitting Wedge, 9" Safety Ring, 17" Height, No Axe Needed, Made in Australia |
|
| 3 | 13.8 Inch XL Manual Log Splitter with Self-Locking V-Blade for Hands-Free Safety - Unbreakable Welded Steel Firewood Cutter - Rust-Proof Electroplated Finish for Large Rounds, Fireplace & Camping |
|
| 4 | Wall Mounted Wood Splitter: Dual-Handle Manual Kindling Splitter with 6-Tooth Clamping, Heavy Duty Steel Log Splitter for Soft Firewood, Includes Gloves and Screws for Indoor and Outdoor Use |
|
| 5 | 2 Pcs 4 Lbs Wood Splitting Wedges Manual Log Splitter Wedge 4-Direction Diamond Design Forged Steel Tool for Easy Wood Splitting Splits Firewood into 4 Pieces Less Effort (Orange) |
|
| 6 | Kindling Cracker Firewood Kindling Splitter — Original Cast Iron Wood Splitting Wedge, 6.5" Safety Ring, 12" Frame, No Axe Needed, New Zealand Designed & Australian Made |
|
| 7 | ESTWING Sure Split Wedge - 5-Pound Wood Splitting Tool with Forged Steel Construction & 1-7/8" Cutting Edge - E-5 |
|
| 8 | Firewood Kindling Splitter, Manual Log Splitter, Cast Iron Log Splitting Wedge, Heavy Duty Wood Splitter Tool with Cover (Black) |
|
| 9 | Wood Kindling Splitter - The Firewood Kindling Tool for Wood Stove Fireplace and Fire Pit |
|
| 10 | KABIN Kindle Quick Compact Log Splitter - Manual Splitting Tool - Steel Wedge Point Splits Firewood Like A Boss Safely & Easily |
|
A hydraulic hose typically consists of an inner tube, reinforcement layers (often braided wire or synthetic fiber), and an outer protective cover. The inner tube is designed to be compatible with hydraulic fluid, while the reinforcement layers provide the necessary strength to contain high pressure. The outer cover protects against abrasion, weather, and chemicals. When the hydraulic pump activates, it forces fluid through these hoses, transmitting power to actuate various parts of your machinery, such as lifting arms or splitting wedges.
Common Causes of Hydraulic Hose Failure
Hydraulic hoses are subjected to harsh conditions and eventually wear out. Common culprits behind hose failure include external abrasion from rubbing against other components or sharp edges, heat damage from engine proximity or overheated fluid, and degradation due to age, sunlight, or chemical exposure. Kinks, cracks, or punctures can compromise the integrity of the reinforcement layers, leading to leaks or catastrophic bursts. Identifying the failure mode can also help prevent future issues.
Essential Tools and Materials for Hydraulic Hose Replacement
Having the right tools and replacement parts on hand before you begin will streamline the process and ensure a safe, effective repair. Don’t start the job only to realize you’re missing a critical item. A little preparation goes a long way.
List of Tools
For a typical hydraulic hose replacement, you will need:
- Safety Gear: Gloves, safety glasses, long sleeves, and pants are essential to protect against hydraulic fluid.
- Wrenches: A set of open-end or adjustable wrenches of various sizes to loosen and tighten fittings. Often, two wrenches are required simultaneously.
- Drain Pan or Bucket: To catch any hydraulic fluid that leaks during removal.
- Rags: For cleaning components and wiping up spills.
- Cardboard: A simple but effective tool for leak detection during testing.
- Cleaning Solution: A degreaser or window cleaner for prepping connections.
- Camera (optional but recommended): To photograph the existing hose routing and connections for reference during reassembly.
Choosing the Right Replacement Hose and Fittings
Selecting the correct replacement hose is paramount. The new hose must exactly match the specifications of the old one in terms of internal diameter (ID), length, and pressure rating. The pressure rating is typically printed on the hose itself (e.g., in PSI). It is advisable to take your old, damaged hose to a reputable hydraulic supplier to ensure you get an exact match. Keep in mind that specialized equipment is needed to crimp fittings onto hoses, so you will likely need to purchase a pre-assembled hose with fittings already crimped on by the supplier. Do not attempt to repair a damaged hose with tape or clamps, as this is unsafe and ineffective under high pressure.
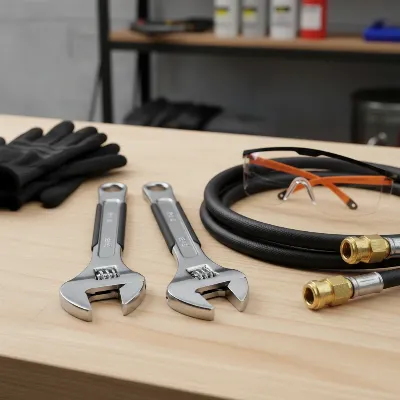 Essential tools for safe hydraulic hose replacement at home, including wrenches, gloves, and safety glasses on a workbench.
Prioritizing Safety: Crucial Steps Before You Begin
Safety is not just a recommendation; it is a critical requirement when working with hydraulic systems. Hydraulic fluid is under extreme pressure and can cause severe injury, including skin penetration, chemical burns, or even death if mishandled. Always approach this task with caution and respect for the powerful forces involved.
Depressurizing the System
Before touching any hose or fitting, the hydraulic system must be completely depressurized. This is the single most important safety step. The exact procedure varies by equipment, so consult your owner’s manual. Generally, this involves:
- Turning off the engine or power source to the hydraulic pump.
- Operating all hydraulic controls (levers, joysticks) back and forth multiple times to release any residual pressure in the lines and cylinders.
- Lowering any raised attachments or mechanisms to the ground to remove live loads.
Never assume the system is depressurized without actively performing these steps.
Personal Protective Equipment (PPE)
Always wear appropriate PPE. This includes:
- Safety Glasses or Goggles: To protect your eyes from spraying fluid or debris.
- Heavy-Duty Gloves: To protect your hands from hydraulic fluid, which is toxic and can cause skin irritation or worse.
- Long Sleeves and Pants: To cover as much skin as possible.
- Respirator or Mask (if needed): If working in a poorly ventilated area, to avoid inhaling fumes.
If hydraulic fluid comes into contact with your skin or eyes, seek immediate medical attention, even for seemingly minor exposure.
Environmental Considerations
Prepare your work area to contain any potential fluid spills. Lay down a thick drop cloth, old cardboard, or place a drain pan directly beneath the hose you intend to remove. Hydraulic fluid can be harmful to the environment and should be collected and disposed of properly according to local regulations. Ensure your workspace is well-lit and free from obstructions.
Step-by-Step Guide to Replacing a Hydraulic Hose
With safety precautions in place and tools ready, you can now proceed with the actual replacement. Precision and cleanliness are key to a successful, leak-free installation.
Identifying and Removing the Old Hose
- Locate the Damaged Hose: Inspect your hydraulic system for obvious signs of failure, such as leaks, cracks, bulges, abrasions, or kinks.
- Document Routing (Optional): If the hose routing is complex, take photos before removal to aid in reassembly.
- Clear Obstructions: Remove any protective coverings, guards, or other components that obstruct access to the hose fittings.
- Clean Connections: Thoroughly clean both ends of the damaged hose and the surrounding connection points on the machine. Dirt, dust, or grime can contaminate the hydraulic system, causing damage.
- Position Drain Pan: Place your drain pan or bucket directly under the hose connections to catch any leaking fluid.
- Remove Fittings: Hydraulic hoses typically have two fittings that secure them. Use two wrenches: one to hold the stationary fitting (the one attached to the machine) and the other to loosen the rotating nut on the hose fitting by turning it counterclockwise. Repeat this process for the other end of the hose.
- Plug Openings: Once the hose is removed, immediately plug the open ports on your machine with clean caps or rags to prevent contaminants from entering the hydraulic system.
Measuring and Preparing the New Hose
As mentioned, the new hose should be an exact match in length, internal diameter, and pressure rating to the original. If your machine’s original hose experienced abrasion, consider adding an abrasion sleeve to the new hose before installation. This fabric sleeve slides over the hose and provides an extra layer of protection, potentially extending its lifespan. Ensure the new hose is clean inside and out; any internal debris can severely damage hydraulic components.
Installing the New Hose and Fittings
- Clean New Fittings: Before installation, meticulously clean the fittings on the new hydraulic hose and the mating connectors on the machine.
- Install One End: Begin by hand-threading one end of the new hose into its corresponding fitting on the machine. Rotate it clockwise until it’s snug. Then, use a wrench to carefully tighten it. Avoid overtightening, as this can damage the fitting or hose. Once the hose stops spinning, it is usually tight enough.
- Install the Second End: The second end can be trickier, as the hose cannot rotate freely. Insert the hose into the connector, hold the hose fitting steady with one wrench, and use a second wrench to rotate the machine’s connector (or the swivel nut on the hose fitting, if applicable) clockwise until tight. Again, do not overtighten.
- Reattach Coverings: Replace any protective coverings, guards, or components that were removed to access the hose. Double-check your reference photos if you took any.
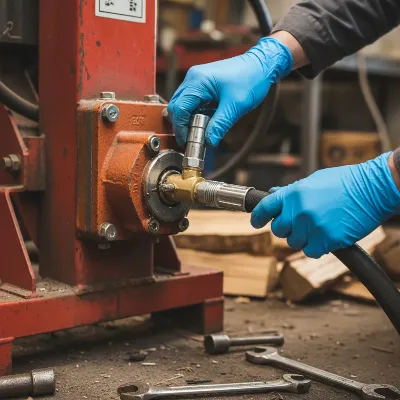 A person carefully installing a new hydraulic hose onto a piece of machinery, emphasizing correct fitting alignment and tightening.
Re-pressurizing and Testing the System
After installation, it’s crucial to test the system for leaks and proper function before returning it to full service.
- Refill Fluid (if necessary): Check your hydraulic fluid reservoir and top it off if any fluid was lost during the replacement.
- Initial Power-Up: Start the machine’s engine or power unit, but operate the hydraulic system at a low pressure or idle setting.
- Check for Leaks: Carefully inspect all new connections for any signs of fluid leakage. Never use your bare hands to check for leaks; instead, run a piece of cardboard or paper along the hose and fittings. A wet spot will indicate a leak. Also, listen for any hissing sounds, which can indicate air leaks.
- Bleed Air: If your system requires bleeding air (common in some cylinders), consult your manual. For many machines, slowly extending and retracting the hydraulic cylinder several times (e.g., five times for a Log Splitter) can help purge trapped air.
- Final Functional Test: Once you confirm there are no leaks and the system feels responsive, you can gradually test the machine under normal operating conditions. If any issues arise, immediately shut down the system, depressurize, and re-inspect your work.
Troubleshooting Common Issues After Replacement
Even with careful installation, sometimes issues can arise. Knowing how to troubleshoot these common problems can save you time and frustration.
Leaks at Connections
Leaks are the most frequent problem after a hose replacement. They usually stem from improperly tightened fittings or contaminated threads.
- Solution: Depressurize the system and re-tighten the fittings, ensuring they are snug but not overtightened. If cleaning the threads before installation was missed, fluid may be seeping past contaminants. Disassemble, clean thoroughly, and reassemble. If the hose or fitting itself appears defective, it may need to be replaced.
Insufficient Pressure
If your hydraulic system seems sluggish or lacks power after a hose change, it could be due to air trapped in the system or an incorrect hose.
- Solution: First, ensure all air is bled from the system by cycling the hydraulic functions repeatedly. Check your fluid level again. Verify that the new hose matches the pressure rating and internal diameter of the original; an undersized hose can restrict flow.
Hose Kinking
A new hose kinking, especially during operation, indicates improper routing or an incorrect hose length.
- Solution: Depressurize the system and re-route the hose, ensuring it has adequate slack and avoids sharp bends or contact points that could cause kinking. If the hose is too short, it will stretch and kink; if too long, it can snag or rub. Ensure the length is correct.
Maintaining Your Hydraulic Hoses for Longevity
Proactive maintenance is the best defense against premature hose failure. Regular checks and proper care can significantly extend the lifespan of your hydraulic hoses and the efficiency of your equipment.
Regular Inspection Tips
Make visual inspections a routine part of your equipment maintenance. Look for:
- Cracks or Abrasion: Examine the outer cover for any signs of wear, cuts, or rubbing. If the outer rubber is worn through, exposing the reinforcement wires, the hose needs immediate replacement.
- Leaks: Even minor seeps indicate a problem. Look for fluid residue around fittings and along the hose body.
- Bulges or Blisters: These are signs of internal damage to the reinforcement layers and indicate an imminent hose burst.
- Kinks or Pinched Sections: Areas where the hose is bent sharply or crushed can restrict flow and weaken the hose structure.
- Age: Hydraulic hoses have a shelf life. Many manufacturers recommend replacement every 4-5 years for regularly used equipment, or up to 10 years even for unused hoses, as rubber degrades over time. Check the manufacture date printed on the hose.
Proper Storage and Handling
When not in use, store equipment with hydraulic hoses in a dry, cool place away from direct sunlight and extreme temperatures. UV radiation and excessive heat or cold can accelerate rubber degradation. Ensure hoses are not kinked or subjected to heavy objects during storage. Proper routing and clamping of hoses during operation can prevent abrasion and vibration damage. Consider protective sleeves for hoses in high-wear areas.
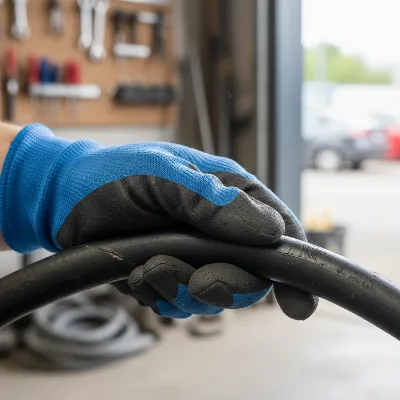 A hand inspecting a hydraulic hose for signs of wear, cracks, or leaks, emphasizing preventative maintenance.
When to Call a Professional
While many hydraulic hose replacements can be a DIY project, there are situations where calling a professional is the wisest course of action. Recognizing your limitations ensures both your safety and the longevity of your equipment.
Complex Systems and High-Pressure Applications
If you are dealing with an exceptionally complex hydraulic system, extremely high-pressure lines (often found in large industrial machinery), or hoses that are difficult to access, professional intervention is recommended. These systems may require specialized tools, advanced diagnostic equipment, or a deeper understanding of hydraulic schematics that goes beyond basic home repairs.
Lack of Confidence or Experience
If you feel unsure about any step of the process, lack confidence in your ability to perform the replacement safely, or simply do not have the necessary tools, do not hesitate to contact a qualified hydraulic technician. The risks associated with improperly installed hydraulic hoses—from severe injury to costly equipment damage—far outweigh the savings of a DIY attempt. Professionals have the training and experience to ensure the job is done correctly and safely.
Conclusion
Replacing a broken hydraulic hose at home is a practical task for many homeowners and small equipment operators, offering significant savings compared to professional service. By meticulously following safety procedures, selecting the correct replacement hose, and adhering to a systematic approach for removal and installation, you can successfully restore your hydraulic machinery. Remember that regular maintenance and proactive inspection are key to preventing future failures, ensuring your equipment remains safe and efficient for years to come. Do you regularly inspect your hydraulic hoses, or do you wait until a leak appears?
Câu Hỏi Thường Gặp
How do I depressurize a hydraulic system before working on it?
To depressurize a hydraulic system, first turn off the machine’s engine or power source. Then, operate all hydraulic control levers back and forth several times to release any residual pressure in the lines. Ensure any raised components or attachments are lowered to the ground to remove any live load before proceeding with hose replacement.
Can I repair a leaking hydraulic hose with tape or clamps?
No, it is critically unsafe and ineffective to repair a leaking hydraulic hose with tape, clamps, or any other temporary patch. Hydraulic hoses operate under extremely high pressure, and any patch will quickly fail, leading to dangerous fluid bursts. The only safe and recommended solution for a damaged hydraulic hose is to replace the entire hose assembly.
How do I know what type of replacement hydraulic hose to buy?
To ensure you buy the correct replacement hose, it must match the original’s internal diameter, length, and pressure rating. The pressure rating (often in PSI) is typically printed on the hose itself. The best practice is to take your damaged hose to a hydraulic supplier to ensure an exact match for both the hose and the crimped-on fittings.
How often should hydraulic hoses be replaced?
Hydraulic hoses have a finite lifespan, even if they appear undamaged. Many manufacturers recommend replacing hoses on actively used equipment every 4 to 5 years. Even unused hoses can degrade over time and should generally be replaced after 10 years, as the rubber material can become brittle and lose its integrity due to age and environmental exposure.
What should I do if hydraulic fluid gets on my skin or in my eyes?
If hydraulic fluid comes into contact with your skin, wash the affected area immediately and thoroughly with soap and water. If it gets in your eyes, flush them with clean water for at least 15 minutes. Regardless of how minor the exposure seems, seek immediate medical attention, as high-pressure injection injuries can be severe and lead to serious health complications if not treated promptly.